Saturday, December 31, 2011

Winding Down.....

Well.

It's been awhile hasn't it?  Christmas has come and gone and we're on the eve of a New Year.  How about that?!  Time flies when you're having fun! 

Hope everyone Christmas was wonderful.  We definitely had a great one and so enjoyed all the down-time post Christmas brought.  We didn't have any set plans this past week and took things one day at a time.  Enjoyed a date night with the hubs, had some pajama days, and pretty much relaxed.  I caught up on a lot of blogs and can I just admit here that I have a serious addiction to Pinterest?  Oh.my.word.  From organizing, decorating, crafting, cooking, you name it, I've probably pinned it!   So many fun ideas.  Lots of talented people out there sharing their gifts.  

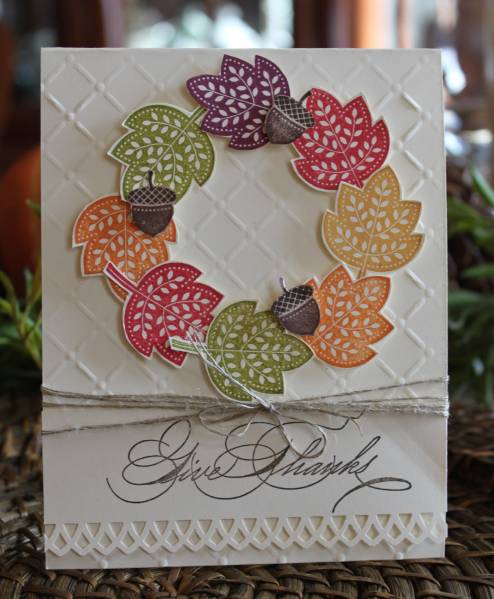
Speaking of gifts, here's the Christmas card I sent out to a few people.  I cased it from the  super talented Vicki  from It's A Stamp Thing.   It did take quite a bit of work and so there weren't that many that were made.  Wished I had photographed some of the other Christmas cards I had made prior to this one, but I was in a hurry to send them out and forgot to.   


No big plans for us tonight.  We are just hanging out at home this evening.  The boys are watching football with dad and I'm going to settle in with my cross stitch.  I've made a start on CCN's monthly series "January" and will post pictures tomorrow. 
Hope everyone has a great evening!
 
 
***Edited to Add***
 
I've had a few inquires to this card as to how the petals were made.  I used Stampin Up!'s Blossom Petals Builder punch, using just the "leaves" of the punch.  You can see it here.
Direct link to Vicki's (who I cased as I explained above) is here.


Friday, December 23, 2011

Snowmen!

Christmas is almost here!  That's what my boys have been telling me on a daily basis since they let out from school for the holiday break.  I think they are just a little bit excited.  And I'm just a little bit tired.  Let me show you one of the reasons why: 

Snowmen.  Snowmen wrapped Hershey candy bars.  Lots of them.  Like about 72 to be exact.  These turned out to be the cutest things and they were a hit with their classmates.  Made them for each of the boys' classmates, teachers and school staff.  They are not difficult at all, just take a little time.   


Originally found these on Splitcoast and the second I saw these, I knew I'd be making them.  Here's a link to a tutorial:  Kerryspapercrafts

I used fleece found at Joann's Crafts, 9mm jingle bells strung with embroidery floss (on some I used baker's twine until I ran out) and half way through, I omitted using the floral wire that Kerry used.  They held just fine with just the floss tied tightly around the fleece hat.  Fabric scissors made snipping the fleece for the hat and scarf quick and easy. 


I'll definitely be making them again next year.   Just plan on starting much earlier to save me a little bit (a lot!) of sanity. 

Are you all ready for Christmas?  I wasn't as organized this year as I would have liked to have been.  Working 5 days rather than 3 made a huge difference but I'm happy to say that although it's been a busy month, we've had good times in between the busyness of it all.  Today I plan on being in the kitchen baking up some more sweets treats to indulge over the weekend and share with friends and the boys will decorate their gingerbread houses.  Finally getting around to that!

Hope your day is merry and bright! 


Pinned Image
Via Pinterest:  http://pinterest.com/pin/63402307223749539/


Tuesday, December 6, 2011

Hershey Pretzel Treats


This weekend I attended a cookie swap and this is the treat I decided on.  While not exactly a cookie, I thought it was festive enough to merit taking.  And can I say easy?!  You can make a bunch of these in no time with minimal mess in the kitchen (like that very much).  I made three variations using different Hershey kisses; Hugs, Dark Chocolate & Peppermint.  My overall favorite is the Hugs kisses.  I originally found this idea on Pinterest.


Recipe:

Hershey Kisses
Square pretzels (I used Synders)
Red & Green M&M's

Preheat oven t0 275 degrees.  On a parchment lined baking sheet, place your pretzels and top with 1 Hershey kiss.  Bake for 5 minutes.  Remove and immedieatly top with an M&M, pushing it slightly into the kiss.  Let cool.  (I put mine into the fridge for quicker firming). 

That's it.  An easy sweet 'n salty treat.

Enjoy!


Saturday, December 3, 2011

Christmas Time....

Hello December!  Time to pull out the sparkle (aka bins & bins!) and make things merry & bright (messy!) around our home.  Last weekend we pulled out the Christmas tree and decorations and got busy on it.  We all love the look and smell of a real tree but since a pine allergy affects us all, we couldn't use live trees anymore.   Found this realistic looking tree at a local garden shop and we just love it.  It's four years old now and it's as pretty as ever.

My boys helping to decorate


A few of my favorite ornaments


The finished tree


Hope all is merry & bright where you are!

Friday, December 2, 2011

Weekend and Small Stitchery

Hello! 

A small stitchery to share today and some snapshots.  This was a free design offered by Primitive Betty that I whipped up a couple of months back while on a long weekend to Asheville, NC.  It was quick and easy on the eyes and hand so it was perfect for the relaxing weekend we had planned.  I used a scrap of what I think is natural raw linen by Zweigart Belfast in 32ct.  Used DMC threads in browns, yellow gold, pumpkin and medium green.  Wished I could remember the exact threads.  Plan on finishing this as a little pillow sometime.  


Here are a few snapshots of the where we spent most of our time.  It was the first of October which was still a little too early to see any great fall color.  The temperatures were perfect though; cool crisp fall mornings and evenings with warmer temps mid to late afternoon.  Great for walking around the estate. (click images to enlarge photo)


The gardens were designed from insiration taken from Tiffany Lamps.  You can just make out the shape of a dragonfly around the pompass grass. 


View of the back of the house


The Conservatory


Another view of the back of the house with the lake in the forefront

It was such a fun and relaxing weekend.  Hope to go there again real soon.

Have a great weekend!

Thursday, November 24, 2011

Happy Thanksgiving


Pinned Image


Pinned Image


Giving thanks today for our abundant blessings and to the Lord:  for He is good and His love endureth forever!

Have a blessed day!

Laura

Wednesday, November 23, 2011

Give Thanks

A sweet fall card for today.  This was fun and easy to put together.  Saw a similar one on Splitcoaststampers as my inspiration.  Used SU's Day of Gratitude set.  Stamped the leaf in a variety of colors, formed a wreath with them over a background done with a Sizzix's Texture Impressions plate (can't remember it's name at the moment) on very vanilla cardstock, a few acorns adorning the wreath.  Used a Martha Stewart decorative edge punch on a small strip at the base and then stamped it with a sentiment from the Hand-Penned Holidays set.  Linen thread finishes  it off.   Next time, I think I will emboss the Give Thanks in gold.  


                                            A few fun Thanksgiving ideas off Pinterest:


                                                image from potterybarnkids.com


                                                              image from kelloggs.com


                                                             image from lefrufrublog.blogspot.com


                                                                        image from livlifetoo.blogspot.com


                                  Wouldn't those pumpkin cinnamon rolls be perfect for 
                                         Thanksgiving day morning?   Mm-mm good!


                                                             Have a lovely day today!


Monday, November 21, 2011

A finish!

Forgot to post pictures of this cute little stitchery from Stacy Nash.  It's called Cast Your Spells.  Love the way the font is stitched.  Finished it as a pillow hanging for my sister in law.  Think I will need to stitch this one sometime for myself.


Stitched on 32ct Natural Raw Linen using DMC threads.

Have a great Monday!

Saturday, November 19, 2011

Blessed Be

A little cross-stitched piece to show you today.  Blessed Be, a freebie pattern by Barbara Cooley of Plum Pudding Needleart. 

Stitched it on 32ct Belfast Linen using the called for DMC threads.  A quick little stitch which will go into my growing pile to be finished into a little pillow. 


You can click here for the free pattern (and a few others).

Have a great weekend!


Wednesday, November 16, 2011

Owl Treat Box

Did someone hit the overdrive button on the time clock?  Seriously, it seems like one minute I'm enjoying it being October and all things pumpkin, then bam! It's the middle of November.  Halloween has come and gone and we're on to Thanksgiving now.  My how time flies!


Made these little owl treat boxes prior to halloween and have been meaning to post.  They are made using SU's Mini Milk Carton die.  Found this tutorial on how to make them here and saw the box I made here.  Used craft cardstock for the box, SU DSP, the owl from the hostess offering in the current holiday mini catalog, and a bat stamp from Michael's dollar bin.  The text was done on the computer and punched out.  They made the cutest little favors.

Have a great Wednesday! 


Supplies Used:

Stamps:  Warmest of Wishes
Paper:  crumb cake cs, daffodil delight, pumpkin pie, dsp
Ink:  black stazon, pumpkin pie marker
Accessories:  dazzling details, owl punch, ribbon, pop dots


Monday, November 14, 2011

Pumpkin Bird House

         Here's a little paper bird house I created for my stamp ladies I had over this past weekend.  It's a total case from Vicki at It's a Stamp Thing.  A little time consuming but so worth it.  I think they turned out so cute!  The pattern for the birdhouse was originally offered to demonstrators on the SU! website but has recently been done away with.  Luckily for me, who didn't download it when I had the chance, I found it one someone else's blog.        The pattern can be found here


For the front of the bird house, I used my Creative Memories oval cutters to create the pumpkin shape.  After they are adhered together and the circle punched out, I ran it thru the SU!'s Wallpaper embossing folder and taped it to the front.  Tucked inside are some chocolate truffles.  Isn't it sweet?


The "welcome" piece was printed out on the computer.  A little leaf cutout, some twine and ribbon finish it off. 


My dining table set for a fall lunch. 

Hope you have a great start to a new week! 


Monday, October 31, 2011

Happy Halloween!


Have a "boo"-licious day!


Supplies:
Stamps: Greeting Card Kids, Holiday Best
Paper:  Black, Rich Razzleberry, Daffodil dsp, white
Ink:  Black Stazon, Markers-Razzleberry, pumpkin pie,
            kiwi, soft suede, basic black, daffodil, blush
Accessories:  Spellbinders scallop and circle, web embossing folder,
             jewel dots, shimmer spritz in Sparkle, ribbon, 
            (not shown in photo: Sizzlit leaves in black, spritzed with shimmer)

Saturday, October 15, 2011

Moonlit Gardens

Here's a fun little stitchery item I did awhile back for the Autumn season.  I'd like to say it's framed up and on display on my wall but, sad to say, it's still waiting to be taken to the framers to have a frame choosen for it. 
This is Moonlit Garden (Loose Feathers #22) by Blackbird Designs.  Saw it first on someone's blog (wish I could remember who) and knew I had to stitch it for myself.  Did a search for it, came to find out that the pattern was no longer available.  Of course!  Searched on ebay and after a bit of patience, came across one that came with the called for fabric.  Sweet! 


I enjoyed every minute of stitching this design and I just love the saying on this Autumn sampler.  My favorite element is the checkerboard house.  Isn't it just fun?  Just a touch of whimsy.  My photography doesn't do the colors in this sampler justice.  I had a difficult time getting the true color of the fabric to come through.  It looks more khaki in the photo below but in real life it has a bit more green-yellowish undertone in it.   The first photos above are closer to what it looks like.  I believe the fabric was 30ct Broomstick by R&R Reproductions.  Threads used are Weeks Dye Works as charted.  Here's my finish:  


  One more finished project to add to the "To Frame List".  Need to get on the ball with that!

Have a lovely fall weekend!